

Introduction
Picture this: It is 7:00 AM on a crisp Tuesday morning in your kitchen. The house is quiet, the sun is just beginning to filter through the blinds, and you are waiting anxiously for that first cup of morning coffee. You push the button on your machine or pour hot water over your grounds, expecting the rich, aromatic bliss of your favorite neighborhood café. Instead, what ends up in your mug tastes bitter, sour, thin, or downright disappointing.
If this scenario sounds painfully familiar, you are certainly not alone. In many U.S. homes, the morning coffee routine is treated as an afterthought—an automatic chore managed by tired hands rather than an intentional craft. Yet, transforming your daily cup from a lackluster necessity into a luxurious ritual does not require thousands of dollars in commercial equipment.
During testing across various residential kitchens, one practical lesson homeowners often discover is that great coffee comes down to mastering a few fundamental variables: water chemistry, grind consistency, and extraction ratios. Whether you are using a standard automatic drip machine that came with your house, a French press tucked in the back of the pantry, or a precision pour-over setup, small adjustments yield dramatic results.
This guide breaks down everything you need to elevate your home brewing game, regardless of your current skill level or budget.
Understanding the Four Pillars of Extraction
Before diving into specific brewing devices, you must understand what is actually happening when water meets roasted coffee beans. Brewing is essentially an extraction process. You are dissolving soluble compounds out of the coffee bean and into the water.
- Under-Extraction: If water passes through the coffee too quickly or is not hot enough, it fails to pull out enough desirable flavors. The result is a sour, salty, thin, and aggressively bright cup.
- Over-Extraction: If water stays in contact with the coffee too long or is too hot, it pulls out bitter, astringent, and dry compounds. The result is a heavy, bitter, and tongue-drying brew.
- Balanced Extraction: This is the sweet spot where the delicate fruity, floral, or chocolatey notes balance out the natural sweetness and pleasant acidity of the bean.
To achieve balance every single time, you need to control four core pillars: water quality, coffee-to-water ratio, grind size, and water temperature.
Pillar One: Water Quality and Temperature
Water makes up roughly 98 percent of your cup of coffee. If your tap water tastes metallic, heavily chlorinated, or overly mineralized, your coffee will taste that way too.
Why Tap Water Sabotages Your Brew
Municipal water supplies vary wildly across the United States. Hard water containing high levels of calcium and magnesium can cause over-extraction, leading to a dull or chalky taste. Conversely, soft or distilled water often produces a flat, lifeless cup because it lacks the minerals necessary to bind with the flavor compounds in the coffee.
Expert Tip: If your drinking water tastes good on its own, it will generally make good coffee. If you rely on refrigerator filters or pitcher filters like PUR or Brita, make sure to change the filters regularly. For the ultimate control, many specialty coffee enthusiasts use filtered water remineralized to specific standards, inspired by guidelines from organizations like the Specialty Coffee Association (SCA).
Water Temperature Matters
Water that is boiling straight off the stove (212°F) will scorch delicate coffee grounds, leading to burnt flavors. Water that is too cool will under-extract.
- Ideal Range: Aim for a water temperature between 195°F and 205°F.
- How to achieve it without a thermometer: Bring your water to a boil, then remove it from the heat source and let it rest for about 30 to 45 seconds before pouring.
Pillar Two: The Golden Ratio
Eyeballing your coffee grounds with a random scoop is the single biggest culprit behind inconsistent coffee. Precision changes everything.
The Standard Coffee-to-Water Ratio
The golden standard recommended by roasting experts for a balanced, flavorful cup is a ratio of 1:16 (one part coffee to sixteen parts water by weight).
- By Weight: For every 1 gram of coffee, use 16 grams of water. If you want a standard 12-ounce mug (approx. 350 grams of water), you will need about 22 grams of coffee beans.
- By Volume (The Kitchen Spoon Method): If you do not own a digital kitchen scale, a general rule of thumb is 2 tablespoons of whole coffee beans (or medium-ground coffee) for every 6 ounces of water.
Pillar Three: The Importance of Grind Size
Pre-ground coffee from the grocery store is convenient, but it loses its aromatic volatile compounds within days of opening. Furthermore, pre-ground coffee is usually milled to a generic, medium size that rarely matches your specific brewing method.
Choosing the Right Grinder
- Burr Grinders (Recommended): These crush coffee beans between two revolving abrasive surfaces (burrs), ensuring uniform particle size. A consistent grind guarantees even extraction.
- Blade Grinders (Not Recommended): These function like miniature food processors, chopping beans into a chaotic mix of boulders and fine dust. The fine dust over-extracts (causing bitterness), while the boulders under-extract (causing sourness).
Visual Grind Size Guide
- Extra Coarse: Resembles sea salt or peppercorns. Used exclusively for Cold Brew and Cowboy Coffee.
- Coarse: Resembles kosher salt or rough sand. Used for French Press and Percolators.
- Medium-Coarse: Resembles rough sand. Used for Clever Drippers and Café Solo.
- Medium: Resembles standard table salt or granulated sugar. Used for Drip Coffee Makers and Siphon Brewers.
- Medium-Fine: Resembles smooth sand. Used for Pour-Over cones (V60, Kalita Wave).
- Fine: Resembles powdered sugar or table salt flour. Used for Espresso and Moka Pots.
- Extra Fine: Resembles confectioner’s sugar. Used for Turkish Coffee.
Step-by-Step Guides for Every Skill Level
Whether you are looking for a fast morning routine or a slow weekend mindfulness practice, here is how to master the most popular brewing methods.
Level One: The Automatic Drip Machine (The Reliable Workhorse)
Most American households own a traditional drip machine. While often viewed as mundane, a standard drip maker can produce incredible coffee if treated correctly.
AUTOMATIC DRIP BREWING CHECKLIST
[✓] Clean the machine reservoir with vinegar monthly
[✓] Use a charcoal or paper filter (rinse paper first)
[✓] Weigh out beans using a 1:16 ratio
[✓] Grind fresh right before brewing
[✓] Serve immediately; avoid burning on the hot plate
Step-by-Step Instructions
- Descale the Machine: Mineral buildup inside the heating element affects water temperature. Run a 50/50 mixture of white vinegar and water through your machine monthly, followed by two cycles of clean water.
- Rinse the Paper Filter: Place your paper filter into the basket and pour a small amount of hot water through it to eliminate the papery taste, then discard that rinse water.
- Add Fresh Grounds: Measure your freshly ground coffee (medium grind) into the wet filter.
- Brew and Pour: Start the cycle. Once finished, do not let the glass carafe sit on the burner for hours, as continuous heat cooks the coffee and ruins the flavor. Transfer it to an insulated thermal carafe if you need it to stay hot.
Level Two: The French Press (Full-Bodied Immersion)
The French press uses an immersion brewing method, meaning coffee grounds steep directly in hot water. This allows rich natural oils and fine sediments to pass through the metal mesh filter, creating a heavy, luxurious mouthfeel.
Step-by-Step Instructions
- Preheat the Press: Pour hot water into your empty French press carafe to warm the glass or stainless steel, then dump it out.
- Add Coarse Grounds: Add coarse-ground coffee (think kosher salt consistency) using your 1:16 ratio.
- The Bloom: Pour just enough hot water over the grounds to saturate them (about twice the weight of the coffee). Let it sit for 30 seconds. You will see bubbles form as trapped carbon dioxide escapes.
- Fill and Steep: Pour the remaining water steadily in a spiral motion. Place the lid on top with the plunger pulled all the way up. Let it steep undisturbed for 4 minutes.
- Press and Pour: Slowly and steadily push the plunger down. Pour the coffee immediately into your mug; leaving it in the press will cause continued extraction and bitterness.
Level Three: The Pour-Over (The Artisan Ritual)
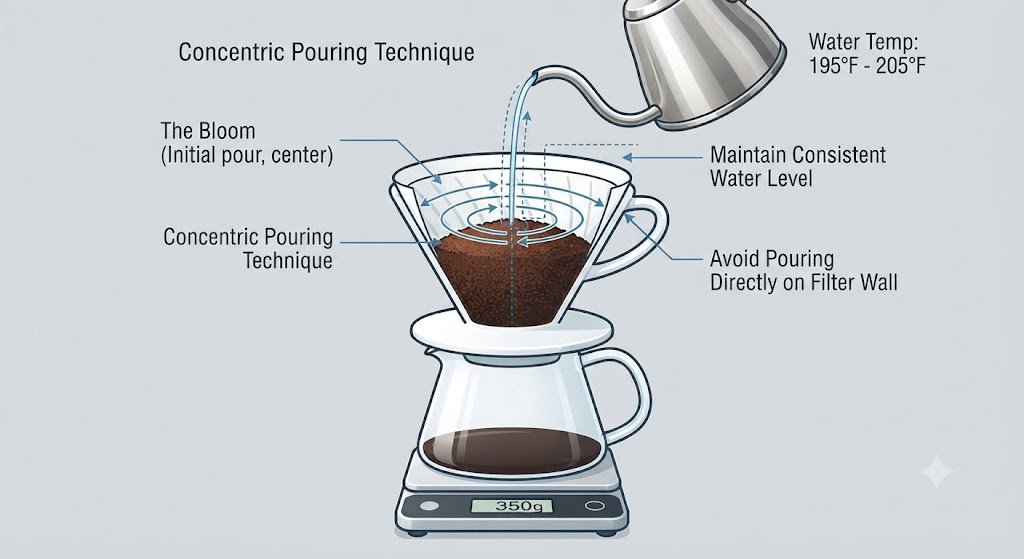
Pour-over brewing (such as using a V60, Chemex, or Kalita Wave) grants absolute control over water flow and extraction, resulting in a crisp, clean cup that highlights delicate flavor notes.
Step-by-Step Instructions
- Set Up: Place your pour-over cone over your mug or carafe. Insert the paper filter and rinse it thoroughly with hot water. Discard the rinse water.
- Add Medium-Fine Coffee: Add your freshly ground coffee and gently shake the cone to level the bed.
- The Bloom Phase: Start your timer and pour twice the weight of the coffee in water (e.g., 44g of water for 22g of coffee). Let it sit for 45 seconds.
- First Pour: Pour water in slow, steady concentric circles starting from the center and moving outward toward the edge, avoiding the paper filter itself. Bring the water level up to about halfway.
- Final Pour: Let the water draw down slightly, then pour the remaining water in gentle pulses until you hit your target weight. The total brew time should take between 3 minutes and 3 minutes and 30 seconds.
Comparison Table: Choosing Your Brewing Method
| Brewing Method | Grind Size | Brew Time | Flavor Profile | Best For |
| Automatic Drip | Medium | 5–8 minutes | Balanced, consistent, smooth | Busy weekday mornings |
| French Press | Coarse | 4 minutes | Heavy body, rich, oily, bold | Coffee lovers who enjoy creaminess |
| Pour-Over | Medium-Fine | 3 minutes | Clean, bright, complex, distinct | Savoring single-origin light roasts |
| Moka Pot | Fine | 5 minutes | Strong, intense, espresso-like | Making milk-based drinks at home |
| Cold Brew | Extra Coarse | 12–24 hours | Low acidity, smooth, naturally sweet | Refreshing iced summer drinks |
Common Mistakes to Avoid
Even with great equipment, small procedural errors can derail your efforts. Watch out for these common pitfalls:
- Using Stale Coffee Beans: Coffee is a perishable agricultural product. Once roasted, beans begin losing their aromatic compounds within two to four weeks. Always check the “Roasted On” date, not just the “Best By” date.
- Storing Beans in the Refrigerator: The fluctuating humidity and odors inside a refrigerator ruin coffee beans. Store your beans in an airtight, opaque container in a cool, dark pantry.
- Neglecting Equipment Hygiene: Old coffee oils cling to carafes, brew baskets, and French press mesh filters. These rancid oils turn bitter and contaminate every fresh batch you brew. Wash your gear with mild soap and warm water regularly.
- Inconsistent Water Pouring: Dumping water haphazardly into a pour-over or drip basket creates channels where water rushes through some grounds while ignoring others, leading to uneven extraction.
Pros and Cons of Upgrading Your Coffee Setup
| Pros | Cons |
| Cost Savings: Making craft coffee at home saves hundreds or thousands of dollars annually compared to daily café purchases. | Learning Curve: Achieving perfection requires experimentation with grind size and ratios. |
| Total Customization: You control the bean origin, roast level, sweetness, and strength. | Counter Space: Quality grinders, scales, and specialty gear take up valuable kitchen real estate. |
| Mindful Routine: Crafting a great cup acts as a rewarding, meditative morning ritual. | Initial Investment: Purchasing a quality burr grinder and scale requires upfront spending. |
Frequently Asked Questions
How long do whole coffee beans stay fresh?
Whole coffee beans are at their peak flavor profile between 7 and 21 days after their roast date. While they remain safe to consume long after, they lose their delicate aromatic notes and taste flat over time.
Why does my home-brewed coffee taste sour?
Sourness is a classic sign of under-extraction. To fix this, try making your grind size finer, using slightly hotter water, or increasing your total brew time. A finer grind slows down the water flow, allowing it to extract more sweet and balanced flavors.
Do I really need a digital kitchen scale?
While you can use volume measurements (like tablespoons), a digital scale measuring in grams completely eliminates inconsistency. Because different coffee bean roasts and densities vary wildly in volume, weight is the only true standard for precision.
How should I store my coffee beans?
Keep your whole beans in an airtight, opaque container designed to block out light, oxygen, and moisture. Avoid clear glass jars left on sunny countertops and never freeze your daily supply, as moisture condensation damages the beans upon thawing.
Final Verdict
Brewing exceptional coffee at home is not an innate talent reserved for professional baristas; it is a repeatable science grounded in basic kitchen techniques. By swapping pre-ground beans for fresh whole beans, investing in a quality burr grinder, measuring your ingredients by weight, and paying attention to water quality, you will instantly outperform most commercial coffee shops right from your own kitchen counter.
Key Takeaways
- Prioritize Freshness: Buy whole bean coffee with a clear “Roasted On” date and grind immediately before brewing.
- Weigh Your Ingredients: Use a 1:16 coffee-to-water ratio on a digital scale for consistent flavor every single time.
- Match Your Grind: Align your grind size directly with your brewing device—coarse for immersion, medium for drip, and fine for espresso.
- Control Your Water: Use filtered water heated between 195°F and 205°F to prevent scorching or under-extracting your grounds.
- Keep Equipment Clean: Wash carafes, brew baskets, and filters regularly to prevent bitter oil buildup.
Conclusion
Transforming your kitchen coffee routine is one of the most satisfying home improvement projects you can undertake. It requires minimal financial investment compared to major kitchen renovations, yet it impacts your daily quality of life immediately. Take it one step at a time—start by upgrading your water and grind consistency, and enjoy exploring the incredible world of home-brewed coffee.