Introduction
Remodeling or building a kitchen is one of the most exciting investments you can make in your home. It can transform how your family gathers, how you cook, and how your entire main floor functions. Yet, it is also the most intricate, high-stakes room in the house. A single miscalculation—such as a dishwasher door that blocks a walkway, an outlet placed too far from the coffee station, or a pantry shelf that doesn’t clear a door swing—can turn a dream kitchen into a daily frustration.
When designing a kitchen, beauty often takes center stage. We fall in love with moody cabinet colors, waterfall quartz edges, and polished brass faucets on Pinterest. But true, lasting kitchen design is rooted in ergonomics, spatial physics, and daily human habits. If a kitchen fails ergonomically, no amount of high-end finishes will make up for the annoyance of squeezing past an island or reaching blindly into a dark corner cabinet.
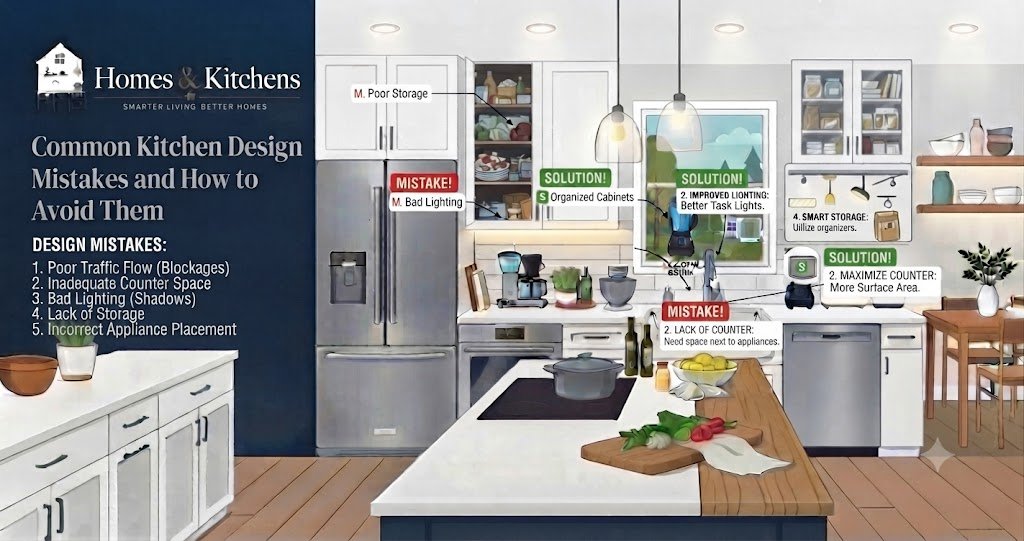
This guide breaks down the 14 most common kitchen design mistakes homeowners make, explains why they happen, and provides practical, step-by-step solutions to avoid them. Whether you are planning a DIY refresh or working with a contractor on a full-gut renovation, this blueprint ensures your kitchen works as beautifully as it looks.
1. Violating the Kitchen Work Triangle (or Ignoring Zones)
For decades, the golden rule of kitchen layout was the kitchen work triangle, which connects the three primary workstations: the sink, the refrigerator, and the cooktop/range. While modern kitchens have evolved to include multiple cooks and specialized zones, ignoring the core principles of functional movement is a recipe for disaster.
The Problem
Putting appliances too far apart creates a marathon every time you cook a simple meal. Conversely, placing them too close together leaves no counter space for food prep, resulting in cramped, chaotic cooking sessions. Another common error is placing a high-traffic appliance—like the refrigerator—on the outer perimeter where family members constantly interrupt the cook.
The Solution
- Maintain Ideal Distances: The sum of the three sides of the work triangle should measure between 13 and 26 feet, with individual sides measuring between 4 and 9 feet.
- Embrace Modern Zone Design: For multi-cook kitchens, organize by task zones rather than a strict triangle:
- Consumables Zone: Refrigerator, pantry, and food storage.
- Non-Consumables Zone: Dishes, glassware, and everyday silverware.
- Cleaning Zone: Sink, dishwasher, and trash pull-out.
- Preparation Zone: Main uninterrupted counter space and knives.
- Cooking Zone: Range, oven, and spice storage.
Expert Tip: Never allow a primary traffic pathway (such as a hallway leading to a garage or backyard) to cut directly across the active cooking zone between your sink and stove.
2. Inadequate Aisle Widths and Clearance Space
One of the most expensive and heartbreaking mistakes in kitchen remodeling is discovering that cabinet drawers or dishwasher doors crash into each other when opened simultaneously.
The Problem
Homeowners often try to maximize storage or make an island “just a bit bigger,” sacrificing the physical space required to move around safely. Narrow aisles create traffic jams and make cooking with two people impossible.
The Solution
Follow National Kitchen and Bath Association (NKBA) clearance guidelines religiously:
- Single-Cook Kitchen Aisles: Maintain a minimum of 42 inches of clearance between opposing cabinets, counters, or appliances.
- Multi-Cook Kitchen Aisles: Allow at least 48 inches of space so two people can pass each other or open appliances safely at the same time.
- Island Clearances: Ensure at least 36 to 42 inches of clearance on all sides of an island, especially behind seating areas where barstools pull out.
| Kitchen Layout Type | Recommended Aisle Width | Why It Matters |
| Single-Wall Kitchen | 42″ to 48″ minimum | Prevents back-to-back crowding with dining tables or islands. |
| Galley Kitchen | 48″ minimum | Allows two people to work back-to-back and doors to open fully. |
| L-Shaped with Island | 42″ to 48″ around the island | Keeps high-traffic walking paths clear of the cooking zone. |
3. Poor Lighting Design (The Single-Source Ceiling Fixture)
Relying on a single, centrally located flush-mount ceiling light or a decorative chandelier is the fastest way to make a stunning kitchen feel dark, dated, and unfunctional.
The Problem
When your primary light source is behind you as you stand at the counter, your own body casts a shadow directly onto your cutting board. This makes chopping vegetables difficult and dangerous.
The Solution
Implement a layered lighting strategy that incorporates four distinct types of illumination:
- Ambient Lighting: General background light from recessed ceiling cans or flush mounts to illuminate the entire room.
- Task Lighting: Focused lighting specifically for work surfaces. Under-cabinet LED strip lighting is non-negotiable for illuminating countertops. Pendants over islands also fall into this category.
- Accent Lighting: Interior cabinet lighting with glass doors or toe-kick lighting to create warmth and depth.
- Natural Lighting: Maximizing window placement and avoiding heavy window treatments that block daylight.
For more inspiration on illuminating your cooking space effectively, explore our guide to Kitchen Lighting Ideas.
4. Neglecting Countertop Prep Space
It is easy to focus so much on appliances and cabinetry that you forget the most important active element of a kitchen: horizontal workspace.
The Problem
Installing a massive range and a huge refrigerator while leaving only a tiny 12-inch strip of counter space next to the sink leaves nowhere to set hot pans, stage ingredients, or house small appliances like coffee makers and toasters.
The Solution
- Prioritize Continuous Counter Space: Ensure you have at least 36 inches of continuous, uninterrupted counter space on at least one side of your primary sink for food preparation.
- Incorporate Landing Zones: Designate a minimum of 15 inches of counter space next to the refrigerator and microwave, and 12 inches on at least one side of the cooktop.
- Evaluate Materials Early: Ensure your chosen surfaces match your lifestyle. If you love baking, consider pairing quartz perimeter counters with a dedicated wooden butcher block prep station. Learn more about durability and upkeep in our comprehensive Countertop Materials guide.
5. Inefficient Storage and Ignoring Vertical Space
Cabinets that stop short of the ceiling collect dust, grease, and clutter, while deep, dark base cabinets force you to get on your hands and knees to find lost pots and pans.
The Problem
Standard fixed shelves in lower cabinets create inaccessible “dead zones” in the back. Meanwhile, leaving a 12-to-18-inch gap between the top of your upper cabinets and the ceiling wastes valuable cubic footage and creates an awkward visual ledge.
The Solution
- Go All the Way to the Ceiling: Extend upper cabinets to the ceiling (using stacked cabinets or tall single doors with crown molding) to maximize storage and eliminate dust traps.
- Choose Drawers Over Doors for Base Units: Replace traditional lower cabinet doors and fixed shelves with deep, full-extension pot-and-pan drawers. Drawers bring the entire contents out into the light instantly.
- Install Pull-Out Accessories: Utilize pull-out pantry shelves, blind-corner organizers (like magic corners or lazy susans), and vertical tray dividers for baking sheets.
If you are looking for ways to declutter and organize your layout, check out our favorite Kitchen Organization Ideas.
6. Overlooking Appliance Door Swings and Clearances
Have you ever tried to open your oven door only to have it hit the kitchen island? Or realized your refrigerator door cannot open past 90 degrees because it hits a corner wall?
The Problem
Appliance specifications are often overlooked during the rough-planning phase. Standard appliances require specific clearance arcs that change dramatically when handles, trim kits, and adjacent walls are factored in.
The Solution
- Check the Wall Clearance: When placing a refrigerator against a side wall, ensure you account for the thickness of the door handles. Many modern refrigerators require a filler strip or extended hinge to open past 90 degrees so the crisper drawers can still be pulled out.
- Map Appliance Interference: Lay out your floor plan at 1:1 scale or use painter’s tape on the subfloor to test appliance door swings in real life. Make sure the dishwasher door does not block the main pathway to the sink or pantry when open.
- Consider Counter-Depth: Select counter-depth refrigerators for cleaner aesthetics and improved walkway clearance in tighter kitchens.
7. Skimping on Electrical Outlets and Code Compliance
Modern kitchens rely heavily on small appliances—air fryers, blenders, stand mixers, coffee grinders, phone chargers, and laptops. An insufficient electrical plan leads to a tangle of unsightly extension cords and power strips.
The Problem
Homeowners frequently forget to place outlets where they are actually needed, or fail to follow modern building codes regarding ground-fault circuit interrupter (GFCI) protection near water sources.
The Solution
- Exceed Code Minimums: National Electrical Code (NEC) specifies that no point along a wall line can be more than 24 inches from an outlet, and any counter space 12 inches or wider needs an outlet. In practice, install outlets every 4 feet along counters.
- Hide Outlets Cleanly: Install pop-up outlets in kitchen islands, under-cabinet power strips to keep tile backsplashes clean and uninterrupted, and dedicated outlets inside pantry cabinets for charging stations or microwaves.
- Plan for Heavy Loads: Ensure your range, refrigerator, dishwasher, and garbage disposal are on dedicated circuits to prevent tripped breakers.
8. Choosing Style Over Substance in Materials
The kitchen is a high-traffic, high-moisture, high-heat environment. Materials that look incredible in a showroom or on social media can fail miserably under real-world family use.
The Problem
Installing delicate, porous marble without understanding that it stains and etches easily from citrus juice and wine, or choosing high-gloss black cabinets that show every single fingerprint and speck of dust.
The Solution
Match your material choices to your family’s lifestyle:
- Countertops: If you love the look of marble but cook every day, look into engineered quartz, which offers marble-like veining with non-porous, stain-resistant durability.
- Flooring: Avoid solid hardwood in high-moisture zones if you have dogs or heavy water spills; engineered wood, luxury vinyl plank (LVP), or porcelain tile offer superior moisture resistance and durability.
- Backsplashes: Choose easy-to-clean ceramic or porcelain tiles over intricate, heavily textured stone mosaics that trap grease and are difficult to wipe down behind a messy stovetop.
9. Forgetting About Ventilation
Many kitchen remodels focus entirely on cooking performance and aesthetics while treating the range hood as a purely decorative element.
The Problem
Under-powered range hoods or recirculating micro-hoods that simply blow greasy air back into the room leave your home smelling like last night’s dinner and coat your upper cabinets in a sticky layer of airborne grease.
The Solution
- Vent to the Outside: Always run rigid metal ductwork directly to the exterior of your home. Avoid flexible foil ducting, which traps grease and restricts airflow.
- Calculate Proper CFM (Cubic Feet per Minute): A good rule of thumb is 100 CFM for every 10,000 BTUs of your cooktop burner output. For high-powered gas ranges, a hood rated at 600 CFM or higher is often necessary (which may also require a makeup air unit per local building codes).
- Cover the Front Burners: Ensure your hood is at least as wide as your cooktop—and ideally extends 3 inches on either side—to capture steam and smoke effectively.
10. Poor Trash and Recycling Integration
Where does the trash go? If the answer is a bulky plastic bin sitting in the middle of the floor or blocking the walkway, your kitchen design has missed a crucial functional element.
The Problem
Treating trash as an afterthought results in unsightly, odorous bins that disrupt the flow of the kitchen and attract pests.
The Solution
- Designate a Pull-Out Trash Center: Dedicate a base cabinet directly next to the prep sink and main workspace for a dual pull-out trash and recycling bin.
- Size Appropriately: Ensure the cabinet holds bins large enough for your household volume so you aren’t forced to empty them multiple times a day.
- Add a Composting Station: If you garden or reduce food waste, include a small countertop compost chute that drops directly into a sealed bin below.
11. Ignoring Landing Zones Near Appliances
Every appliance needs a place to set things down immediately before and after use.
The Problem
Placing a wall oven or refrigerator on the opposite side of the kitchen from any counter space means carrying hot, heavy roasting pans across open walkways with nowhere to set them down.
The Solution
- The Microwave Rule: Never place a microwave too high (especially above eye level for children) or without an adjacent landing zone. Countertop-height microwaves or drawer microwaves integrated into islands with counter space directly above them are far safer.
- Oven Landing Zones: Ensure there is a heat-resistant surface (like quartz, granite, or tile) within arm’s reach of every oven, wall oven, and microwave.
12. Overlooking Budget Contingency Funds
While this is a financial error, it directly impacts design quality. Running out of money halfway through a kitchen remodel forces compromised design decisions.
The Problem
Homeowners allocate 100% of their budget to cabinets, appliances, and labor, leaving zero buffer for unexpected structural issues behind walls, electrical upgrades, or permit fees.
The Solution
- Build a 15% to 20% Contingency: Always set aside a dedicated emergency fund specifically for the unexpected. Older homes almost always reveal outdated plumbing, ungrounded wiring, or uneven subfloors once demolition begins.
- Phased Upgrades: If funds are tight, invest your core budget into structural layout, quality cabinetry, and reliable plumbing. Splurge items like high-end decorative hardware or luxury pendant lights can easily be upgraded later.
For a realistic look at what things cost and how to allocate your funds wisely, consult our detailed Kitchen Remodel Cost Guide.
13. Forgetting Charging Stations and Modern Tech Integration
Modern households manage multiple phones, tablets, smart displays, laptops, and cordless vacuum chargers. Without a planned charging strategy, cords take over your countertops.
The Problem
Charging devices on the main kitchen island creates visual clutter and takes up valuable food prep space.
The Solution
- Create a Dedicated Charging Drawer: Install a power outlet strip inside a shallow upper or lower drawer near the command center to charge devices out of sight.
- Plan for Smart Home Integration: Consider where smart displays, digital recipe hubs, smart thermostats, or automatic window shades will need power or Wi-Fi coverage.
14. Going It Alone Without Professional Guidance
While DIY demolition, painting, and basic shelving installation are great ways to save money, tackling complex kitchen design without expert consultation often leads to costly structural mistakes.
The Problem
Misjudging load-bearing walls, miscalculating gas line placements, or ordering custom cabinets with incorrect dimensions can ruin a project and cost thousands in corrective labor.
The Solution
- Know When to Hire a Pro: Consult a certified kitchen designer (CKD) or structural engineer when moving plumbing stacks, removing walls, or designing complex layouts.
- Validate Measurements: Always have professional installers measure your space before ordering custom cabinetry or stone countertops. Field measurements account for out-of-square walls that tape measures alone often miss.
Essential Comparison: Good vs. Bad Kitchen Layout Planning
| Design Element | Poor Design Approach | Expert Design Approach |
| Primary Sink & Stove | Placed far apart or blocked by island corners. | Positioned within an efficient work triangle or zone workflow. |
| Base Cabinets | Traditional doors with fixed, dark shelves. | Full-extension deep drawers and pull-out organizers. |
| Lighting | One single flush-mount ceiling light fixture. | Layered ambient, task, under-cabinet, and accent lighting. |
| Ventilation | Recirculating micro-hood with no exterior duct. | High-CFM blower vented directly to the exterior. |
| Trash Storage | Standalone plastic trash can in the walkway. | Integrated pull-out cabinet next to the prep sink. |
Frequently Asked Questions
What is the biggest mistake in kitchen design?
The biggest mistake is prioritizing cosmetic trends over functional workflow and ergonomics—such as failing to provide adequate counter space near major appliances or blocking walkways with narrow aisles.
How much space do I need between a kitchen island and counters?
You need a minimum of 36 to 42 inches for a single-cook kitchen, and 48 inches for a multi-cook kitchen or behind seating areas so barstools can be pulled out comfortably.
Should I choose cabinet doors or drawers for base cabinets?
Whenever possible, choose deep drawers for base cabinets. They provide superior ergonomics by bringing items out into full view, eliminating the need to bend down and reach into dark cabinet backs.
How high should under-cabinet lighting be installed?
Under-cabinet LED strip lights should typically be installed near the front lip of the underside of the upper cabinet (facing toward the wall) to prevent glare on polished countertops and evenly illuminate the workspace.
Do I really need a counter-depth refrigerator?
While standard-depth refrigerators offer more interior capacity, they stick out past standard 24-inch base cabinets, disrupting traffic flow and creating visual bulk. Counter-depth models provide a seamless, built-in look.
How can I make a small kitchen feel larger without remodeling?
Improve task lighting under cabinets, switch to light, reflective backsplash tiles, remove clutter from countertops, and ensure window treatments allow maximum natural daylight into the room.
What is the ideal height for a kitchen island?
Standard kitchen island height is 36 inches to match standard base cabinets and countertops. If your island includes a raised bar seating area, that section is typically raised to 42 inches.
How do I calculate my kitchen remodel budget?
A standard kitchen remodel typically allocates roughly 35% to 40% for cabinetry and hardware, 15% to 20% for labor, 10% to 15% for appliances, 10% to 15% for countertops, and a mandatory 15% to 20% contingency fund.
Final Verdict & Conclusion
Designing a successful kitchen is a delicate balance of art, science, and practical human ergonomics. By avoiding these 14 common mistakes—ranging from cramped aisle widths and poor lighting to insufficient counter space and inadequate ventilation—you can create a space that is both breathtakingly beautiful and a joy to cook in every single day.
Take your time during the planning phase, measure twice, prioritize workflow and storage over fleeting aesthetic trends, and don’t hesitate to bring in professionals for structural and electrical work. A thoughtfully planned kitchen is the heart of a home, built to serve your family faithfully for decades to come.